I recently had a need of create some script in Windows environment. I knew about Groovy for some time so I decided to try it. In my opinion this is very strong alternative for Python and for Perl. Because of the fact it uses Java virtual machine, it can be easily launched on every platform where Java is supported. It may also be merged with Java classes so any code you have there somewhere can be used in Groovy script. But this is not all. The very interesting features I would like to show in this post are: ability to create nice domain specific language, handling of XML files (and other form of storing the data) and handling GUI interfaces via Swing library.
Domain specific language
I have already spoke few words about DSL HERE. Groovy has a nice ability to easily create your own language.
This application does… well I do not have to describe what it does – it is self explanatory:
|
1 2 3 4 5 6 7 8 9 10 11 |
package com.passfailerror.dir_browser import static com.passfailerror.dir_browser.Actions.browse import static com.passfailerror.dir_browser.Entity.* browse directory: "C:\\Program Files (x86)\\Notepad++", for: directories browse directory: "C:\\Program Files (x86)\\Notepad++", for: files browse directory: "C:\\Program Files (x86)\\Notepad++", for: files, with (extension: XML) browse directory: "C:\\Program Files (x86)\\Notepad++", for: files, with (extension: DLL) browse directory: "C:\\Program Files (x86)\\Notepad++", for: files, with (extension: EMPTY) |
The output of this application is:
|
1 2 3 4 5 6 7 8 9 10 11 12 13 14 15 16 17 18 19 20 21 22 23 24 25 26 27 28 29 30 31 32 33 34 35 |
directories C:\Program Files (x86)\Notepad++\localization C:\Program Files (x86)\Notepad++\plugins C:\Program Files (x86)\Notepad++\updater files C:\Program Files (x86)\Notepad++\allowAppDataPlugins.xml C:\Program Files (x86)\Notepad++\change.log C:\Program Files (x86)\Notepad++\config.model.xml C:\Program Files (x86)\Notepad++\contextMenu.xml C:\Program Files (x86)\Notepad++\functionList.xml C:\Program Files (x86)\Notepad++\langs.model.xml C:\Program Files (x86)\Notepad++\LICENSE C:\Program Files (x86)\Notepad++\notepad++.exe C:\Program Files (x86)\Notepad++\NppShell_06.dll C:\Program Files (x86)\Notepad++\readme.txt C:\Program Files (x86)\Notepad++\SciLexer.dll C:\Program Files (x86)\Notepad++\shortcuts.xml C:\Program Files (x86)\Notepad++\stylers.model.xml C:\Program Files (x86)\Notepad++\uninstall.exe files (using extension: xml) C:\Program Files (x86)\Notepad++\allowAppDataPlugins.xml C:\Program Files (x86)\Notepad++\config.model.xml C:\Program Files (x86)\Notepad++\contextMenu.xml C:\Program Files (x86)\Notepad++\functionList.xml C:\Program Files (x86)\Notepad++\langs.model.xml C:\Program Files (x86)\Notepad++\shortcuts.xml C:\Program Files (x86)\Notepad++\stylers.model.xml files (using extension: dll) C:\Program Files (x86)\Notepad++\NppShell_06.dll C:\Program Files (x86)\Notepad++\SciLexer.dll files (using extension: empty) C:\Program Files (x86)\Notepad++\LICENSE |
It is not only the domain language we can construct but also short code inside. There are 4 files there and let me just show you filtering functionality for files:
|
1 2 3 4 5 6 7 8 9 10 |
println "(using extension: ${extension})" if (extension.contentEquals("empty")){ directoryContent.traverse(type: FileType.FILES, maxDepth: 0, nameFilter: ~/[a-zA-Z0-9+]+(\.[a-zA-Z0-9+]{4,}$)*/) { println it } } else { directoryContent.traverse(type: FileType.FILES, maxDepth: 0, nameFilter: ~/.*\.${extension}$/) { println it } |
You can see the full code HERE.
XML handling
This is the best and easiest way to process XML I have seen so far. I extend the functionality of the previous application so that it opens config.model.xml file (which is part of Notepad++ distribution) and then displays GUIconfig element’s attributes. Take a look, we have DSL part:
|
1 2 3 4 5 6 7 8 |
package com.passfailerror.xml_viewer import static com.passfailerror.xml_viewer.Actions.* import static com.passfailerror.xml_viewer.Entity.* parse file: "C:\\Program Files (x86)\\Notepad++\\config.model.xml", get: AppPosition |
The output:
|
1 2 3 4 5 6 7 8 |
value is: attributes are: height:659 name:AppPosition width:955 isMaximized:no y:27 x:30 |
And the internals:
|
1 2 3 4 5 6 7 8 9 10 11 12 13 |
package com.passfailerror.xml_viewer class Entity { static AppPosition = "AppPosition" static TabBar = "TabBar" static NewDocDefaultSettings = "NewDocDefaultSettings" static AutoDetection = "Auto-detection" static TrayIcon = "TrayIcon" } |
|
1 2 3 4 5 6 7 8 9 10 11 12 13 14 15 16 17 18 19 20 21 22 |
package com.passfailerror.xml_viewer class Actions { static parse(Map args){ def NotepadPlus = new XmlSlurper().parse(new File("${args.file}")) def result = NotepadPlus.GUIConfigs.GUIConfig.each{ if (it.@name == "${args.get}") { println "value is: ${it.text()}" println "attributes are:" it.attributes().each{ k, v -> println "${k}:${v}" } } } } } |
And that’s it. Finally there is an easy way of processing XML files. This is very frequent task to deal with such a format data is stored…
In line 8 file is parsed into variable which has the name as the root node of the XML document. Then, in line 10, one uses child element’s names to build a path. After iterating with “each” keyword we assert @name attribute and if it matches we iterate over attributes. Short, simple and clear.
It is important to mention,
there is the same way of working with JSON
(and that was a short poetry, did you notice?)
The full code is HERE.
And XML file I was using looks like this:
|
1 2 3 4 5 6 7 8 9 10 11 12 13 14 15 16 17 18 19 20 21 22 23 24 25 26 27 28 29 30 31 32 33 34 35 36 37 38 39 40 41 42 43 44 45 46 47 48 49 50 51 52 53 54 55 56 57 58 59 60 61 62 63 64 65 66 67 68 69 70 71 72 73 74 75 76 77 78 79 80 81 82 83 |
<?xml version="1.0" encoding="Windows-1252" ?> <NotepadPlus> <GUIConfigs> <!-- 3 status : "large", "small" or "hide"--> <GUIConfig name="ToolBar">standard</GUIConfig> <!-- 2 status : "show" or "hide"--> <GUIConfig name="StatusBar">show</GUIConfig> <!-- For all attributs, 2 status : "yes" or "no"--> <GUIConfig name="TabBar" dragAndDrop="yes" drawTopBar="yes" drawInactiveTab="yes" reduce="yes" closeButton="yes" doubleClick2Close="no" vertical="no" multiLine="no" hide="no" /> <!-- 2 positions : "horizontal" or "vertical"--> <GUIConfig name="ScintillaViewsSplitter">vertical</GUIConfig> <!-- For the attribut of position, 2 status : docked or undocked ; 2 status : "show" or "hide" --> <GUIConfig name="UserDefineDlg" position="undocked">hide</GUIConfig> <GUIConfig name="TabSetting" size="4" replaceBySpace="no" /> <!--App position--> <GUIConfig name="AppPosition" x="30" y="27" width="955" height="659" isMaximized="no" /> <!-- For the primary scintilla view, 2 status for Attribut lineNumberMargin, bookMarkMargin, indentGuideLine and currentLineHilitingShow: "show" or "hide" 4 status for Attribut folderMarkStyle : "simple", "arrow", "circle" and "box" --> <GUIConfig name="ScintillaPrimaryView" lineNumberMargin="show" bookMarkMargin="show" folderMarkStyle="box" indentGuideLine="show" currentLineHilitingShow="show" Wrap="no" edge="no" edgeNbColumn="100" wrapSymbolShow="hide" zoom="0" whiteSpaceShow="hide" eolShow="hide" /> <!-- For the secodary scintilla view, 2 status for Attribut lineNumberMargin, bookMarkMargin, indentGuideLine and currentLineHilitingShow: "show" or "hide" 4 status for Attribut folderMarkStyle : "simple", "arrow", "circle" and "box" --> <GUIConfig name="Auto-detection">yes</GUIConfig> <GUIConfig name="CheckHistoryFiles">no</GUIConfig> <GUIConfig name="TrayIcon">no</GUIConfig> <GUIConfig name="RememberLastSession">yes</GUIConfig> <!-- New Document default settings : format = 0/1/2 -> win/unix/mac encoding = 0/1/2/3/4/5 -> ANSI/UCS2Big/UCS2small/UTF8/UTF8-BOM defaultLang = 0/1/2/.. Note 1 : UTF8-BOM -> UTF8 without BOM Note 2 : for defaultLang : 0 -> L_TXT 1 -> L_PHP ... (see source file) --> <GUIConfig name="NewDocDefaultSettings" format="0" encoding="4" lang="0" codepage="-1" openAnsiAsUTF8="yes" /> <GUIConfig name="langsExcluded" gr0="0" gr1="0" gr2="0" gr3="0" gr4="0" gr5="0" gr6="0" gr7="0" langMenuCompact="yes"/> <!-- printOption is print colour setting, the following values are possible : 0 : WYSIWYG 1 : Invert colour 2 : B & W 3 : WYSIWYG but without background colour --> <GUIConfig name="Print" lineNumber="no" printOption="3" headerLeft="$(FULL_CURRENT_PATH)" headerMiddle="" headerRight="$(LONG_DATE) $(TIME)" headerFontName="IBMPC" headerFontStyle="1" headerFontSize="8" footerLeft="" footerMiddle="-$(CURRENT_PRINTING_PAGE)-" footerRight="" footerFontName="" footerFontStyle="0" footerFontSize="9" margeLeft="0" margeTop="0" margeRight="0" margeBottom="0" /> <!-- Backup Setting : 0 : non backup 1 : simple backup 2 : verbose backup --> <GUIConfig name="Backup" action="0" useCustumDir="no" dir="" /> <GUIConfig name="TaskList">yes</GUIConfig> <GUIConfig name="SaveOpenFileInSameDir">no</GUIConfig> <!-- value 0 for the folloing parameters means invisible : leftWidth, topHight, rightWidth, bottomHight position value for the PluginDlg: 0 : left 1 : right 2 : top 3 : bottom >= 4 : undocked -> FloatingWindow id --> <GUIConfig name="noUpdate">no</GUIConfig> <GUIConfig name="MaitainIndent">yes</GUIConfig> <GUIConfig name="MRU">yes</GUIConfig> <GUIConfig name="URL">2</GUIConfig> <GUIConfig name="globalOverride" fg="no" bg="no" font="no" fontSize="no" bold="no" italic="no" underline="no" /> <GUIConfig name="auto-completion" autoCAction="3" triggerFromNbChar="1" funcParams="yes" /> <GUIConfig name="auto-insert" parentheses="yes" brackets="yes" curlyBrackets="yes" quotes="no" doubleQuotes="yes" htmlXmlTag="no" /> <GUIConfig name="multiInst" setting="0" /> <GUIConfig name="sessionExt"></GUIConfig> </GUIConfigs> <!-- The History of opened files list --> <History nbMaxFile="15" /> </NotepadPlus> |
GUI
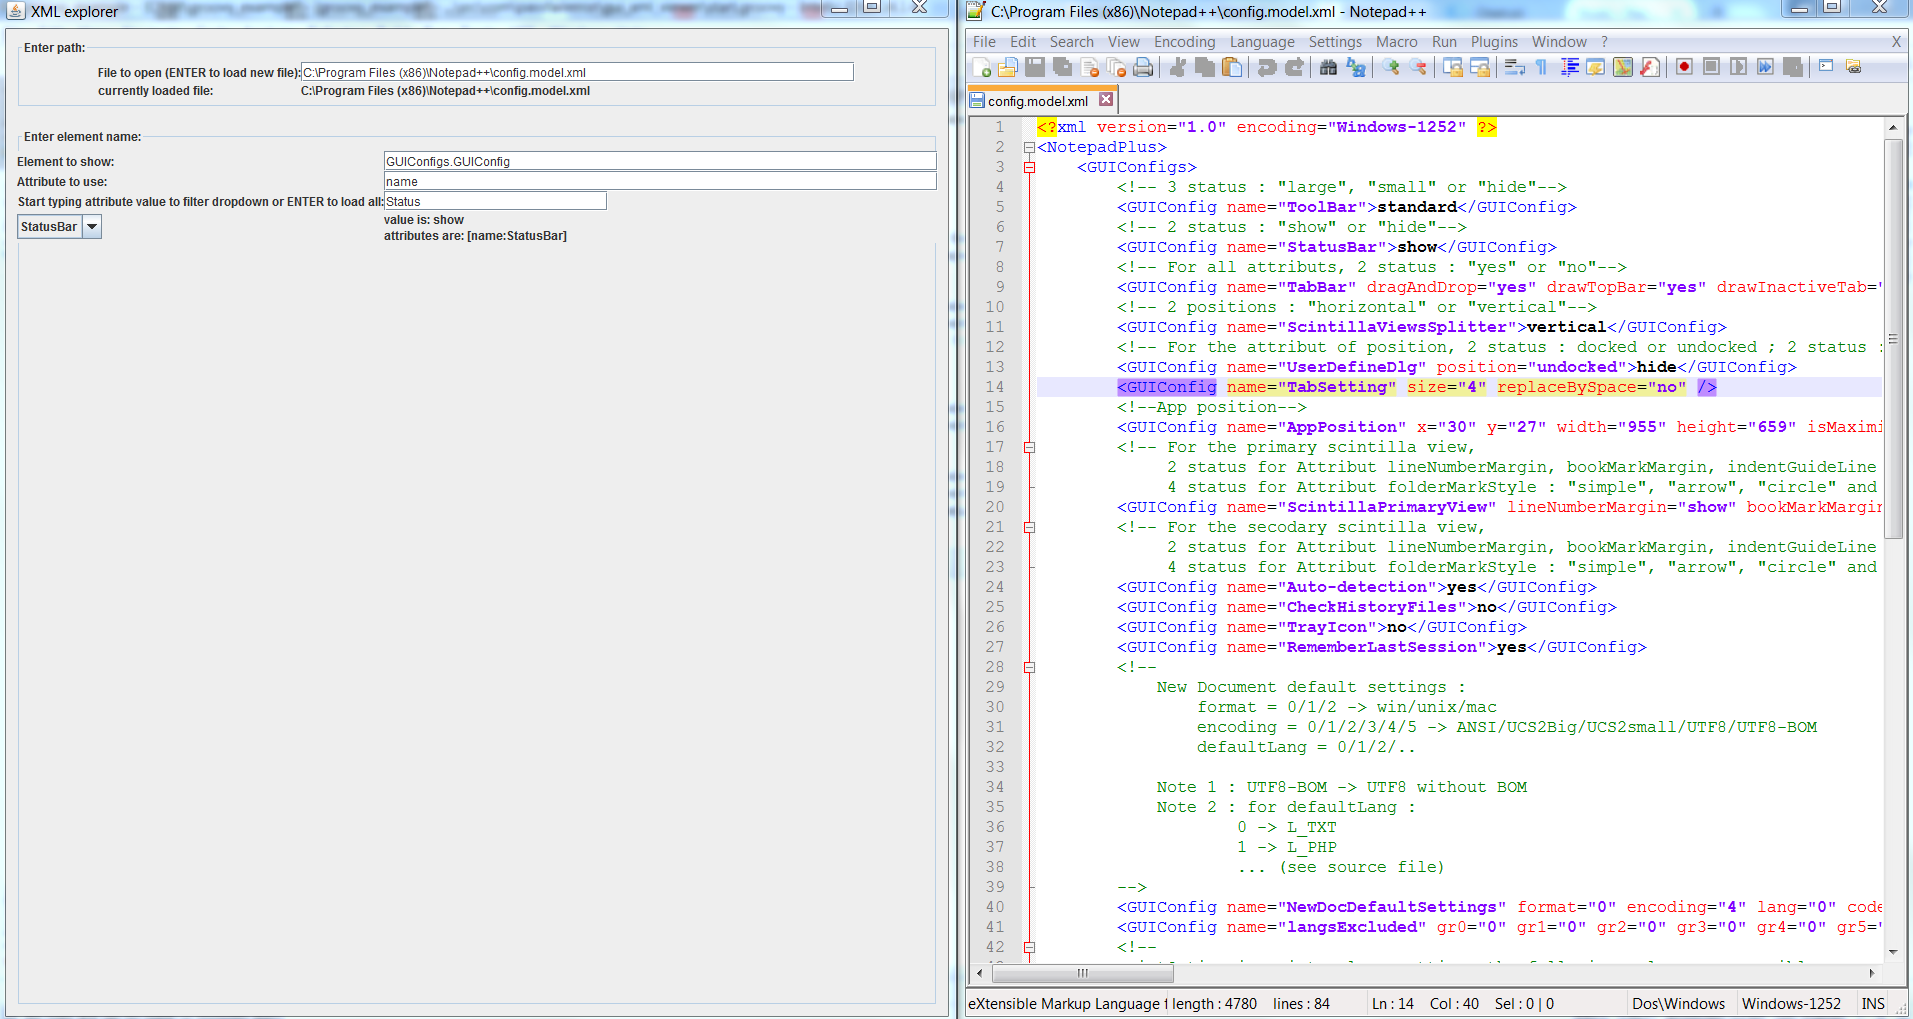
This is also easy to create simple GUI interface to have more rich tool by your hand. In this example I create a small application which will show the values for given elements and all its attributes. This also have auto completion/suggestion feature for more friendly user interface. The default behaviour is to open config.model.xml file and find all attributes of GUIConfigs.GUIConfig element with specific “name” attribute. File path, element path and attribute name are customizable.
The whole application is only in 1 file, so if you copy paste you could run it immediately:
|
1 2 3 4 5 6 7 8 9 10 11 12 13 14 15 16 17 18 19 20 21 22 23 24 25 26 27 28 29 30 31 32 33 34 35 36 37 38 39 40 41 42 43 44 45 46 47 48 49 50 51 52 53 54 55 56 57 58 59 60 61 62 63 64 65 66 67 68 69 70 71 72 73 74 75 76 77 78 79 80 81 82 83 84 85 86 87 88 89 90 91 92 93 94 95 96 97 98 99 100 101 102 103 104 105 106 107 108 109 110 111 112 113 114 115 116 117 118 119 120 121 122 123 124 125 126 127 128 129 130 131 132 133 |
package com.passfailerror.gui_xml_viewer import groovy.swing.SwingBuilder import groovy.util.slurpersupport.GPathResult import javax.swing.event.DocumentListener import java.awt.BorderLayout def xml new SwingBuilder().edt { frame(title: 'XML explorer', size: [1000, 500], show: true) { borderLayout() def buildNodePath = { String nodePath -> def node = xml nodePath.split("\\.").each { node = node."${it}" } return node } def quickList = { String nodePath -> def result = [] def node = buildNodePath(nodePath) if (element.text == null) { println "checking" + it.@"${attribute.text}" result.add(it.@"${attribute.text}") } else { node.each { println "checking " + it.@"${attribute.text}" if ((it.@"${attribute.text}" as String).startsWith(nameLookup.text)) { result.add(it.@"${attribute.text}") } } } println "result: ${result}" return result as String[] } def autoComplete = { if (xml == null) { xml = new XmlSlurper().parse(new File(path.text)) current_file.text = path.text } combo.removeAllItems() quickList(element.text).each { combo.addItem(it) } } def getAttributeSummaryOfElement = { String nodePath, String attributeValue -> def node = buildNodePath(nodePath) def result = [] node.each { if (it.@"${attribute.text}" == attributeValue) { println "value is: ${it.text()}" println "attributes are:" it.attributes().each { k, v -> println "${k}:${v}" } result.add(it) } } return result } panel(constraints: BorderLayout.NORTH, border: compoundBorder([emptyBorder(10), titledBorder('Enter path:')])) { tableLayout { tr { td { label 'File to open (ENTER to load new file):' } td { textField(id: 'path', columns: 50, text = "C:\\Program Files (x86)\\Notepad++\\config.model.xml", actionPerformed: { xml = new XmlSlurper().parse(new File(path.text)) current_file.text = path.text }) } } tr { td { label 'currently loaded file: ' } td { label(id: 'current_file') } } } } panel(constraints: BorderLayout.CENTER, border: compoundBorder([emptyBorder(10), titledBorder('Enter element name:')])) { tableLayout { tr { td { label 'Element to show:' } td { textField(id: 'element', columns: 50, text = "GUIConfigs.GUIConfig") // NotepadPlus.GUIConfigs.GUIConfig } } tr { td { label 'Attribute to use:' } td { textField(id: 'attribute', columns: 50, text = "name") } } tr { td { label "Start typing attribute value to filter dropdown or ENTER to load all:" } td { textField(id: 'nameLookup', columns: 20, actionPerformed: { autoComplete() }) nameLookup.document.addDocumentListener( [insertUpdate : { autoComplete() }, removeUpdate : { autoComplete() }, changedUpdate: { autoComplete() }] as DocumentListener) } } tr { td { comboBox(id: 'combo', actionPerformed: { def result = getAttributeSummaryOfElement(element.text, combo.getSelectedItem()) result.each { attribute_summary.text = "<html>value is: ${it.text()} <br> attributes are: ${it.attributes()}</html>" } }) } td { label(id: 'attribute_summary') } } } } } } |
The first part is the logic:
- buildNodePath builds a node path out of user input; this shows how to navigate through xml document when user is to provide node names during runtime
- quickList displays the attributes which match string entered by user (“App” will show //GUIConfigs/GUIConfig[@name=”AppPosition”] is available and when confirmed it will display the value and all the attributes of //GUIConfigs/GUIConfig element)
- autoComplete populates dropdown
- getAttributeSummaryOfElement displays all attributes and the value of the given element
The second part is the layout done by Swing in Groovy. There is very clear way of positioning items on the screen by using html like trs and tds.
You can view the code HERE.
The screenshot of the application (wordpad on the right side):
The movie which shows the runtime:
Nice tool
This is nice tool worth reading about it more. There are small drawbacks from my point of view especially when mixing things with Java code. I often find myself writing some Javish Groovy or Groovish Java… still this is clearly an advantage as you can append existing Java code to your script. I think I like XML/JSON processing most, this is extremly useful. I also am impressed by details like this one:
|
1 2 3 4 5 |
package com.passfailerror def test = ["a","b","c"] println test.last() |
It gives “c” in the output. Isn’t the simplicity impressing in Groovy ?